Wednesday, August 1, 2012

Deborah Lippmann: Across the Universe

I know, I've been away for a while. I just started a new job as a pharmacy tech, which requires tons of training, and I was studying for the MCAT. That did leave me much time for blogging, or for even painting my nails! Well, I almost completed my training and I took my MCAT last Friday so now I finally have time to paint and blog once more. Hooray!! 

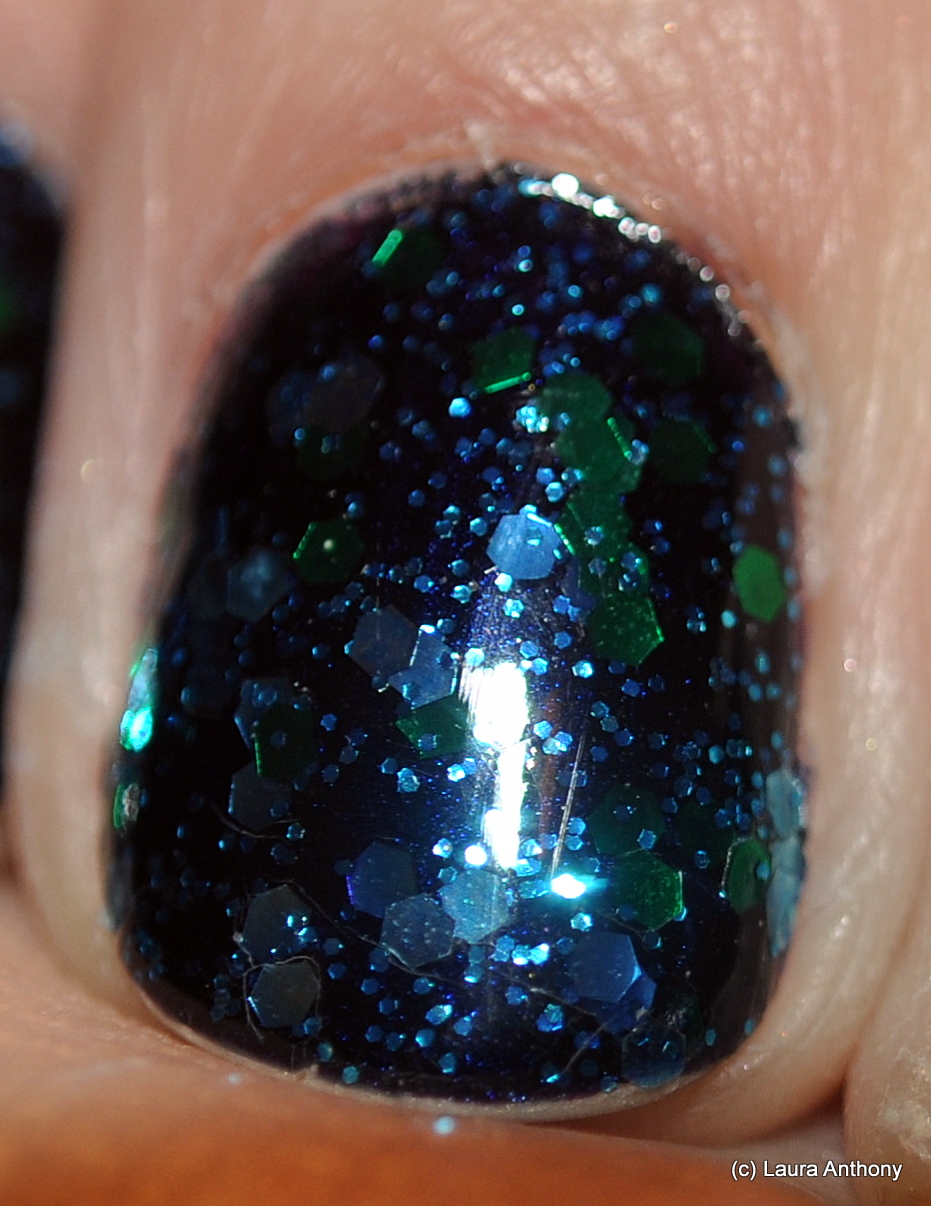
As promised earlier on my Facebook page, today I am bringing you Across the Universe by Deborah Lippmann. Across the Universe is just filled with micro blue glitter and medium light blue and green hex glitter suspended in a dark blue jelly base.

Up first I have the standard bottle shot.


Isn't it lovely in the bottle? This is definitely one to keep out on display! You can just see how packed with glitter it is.


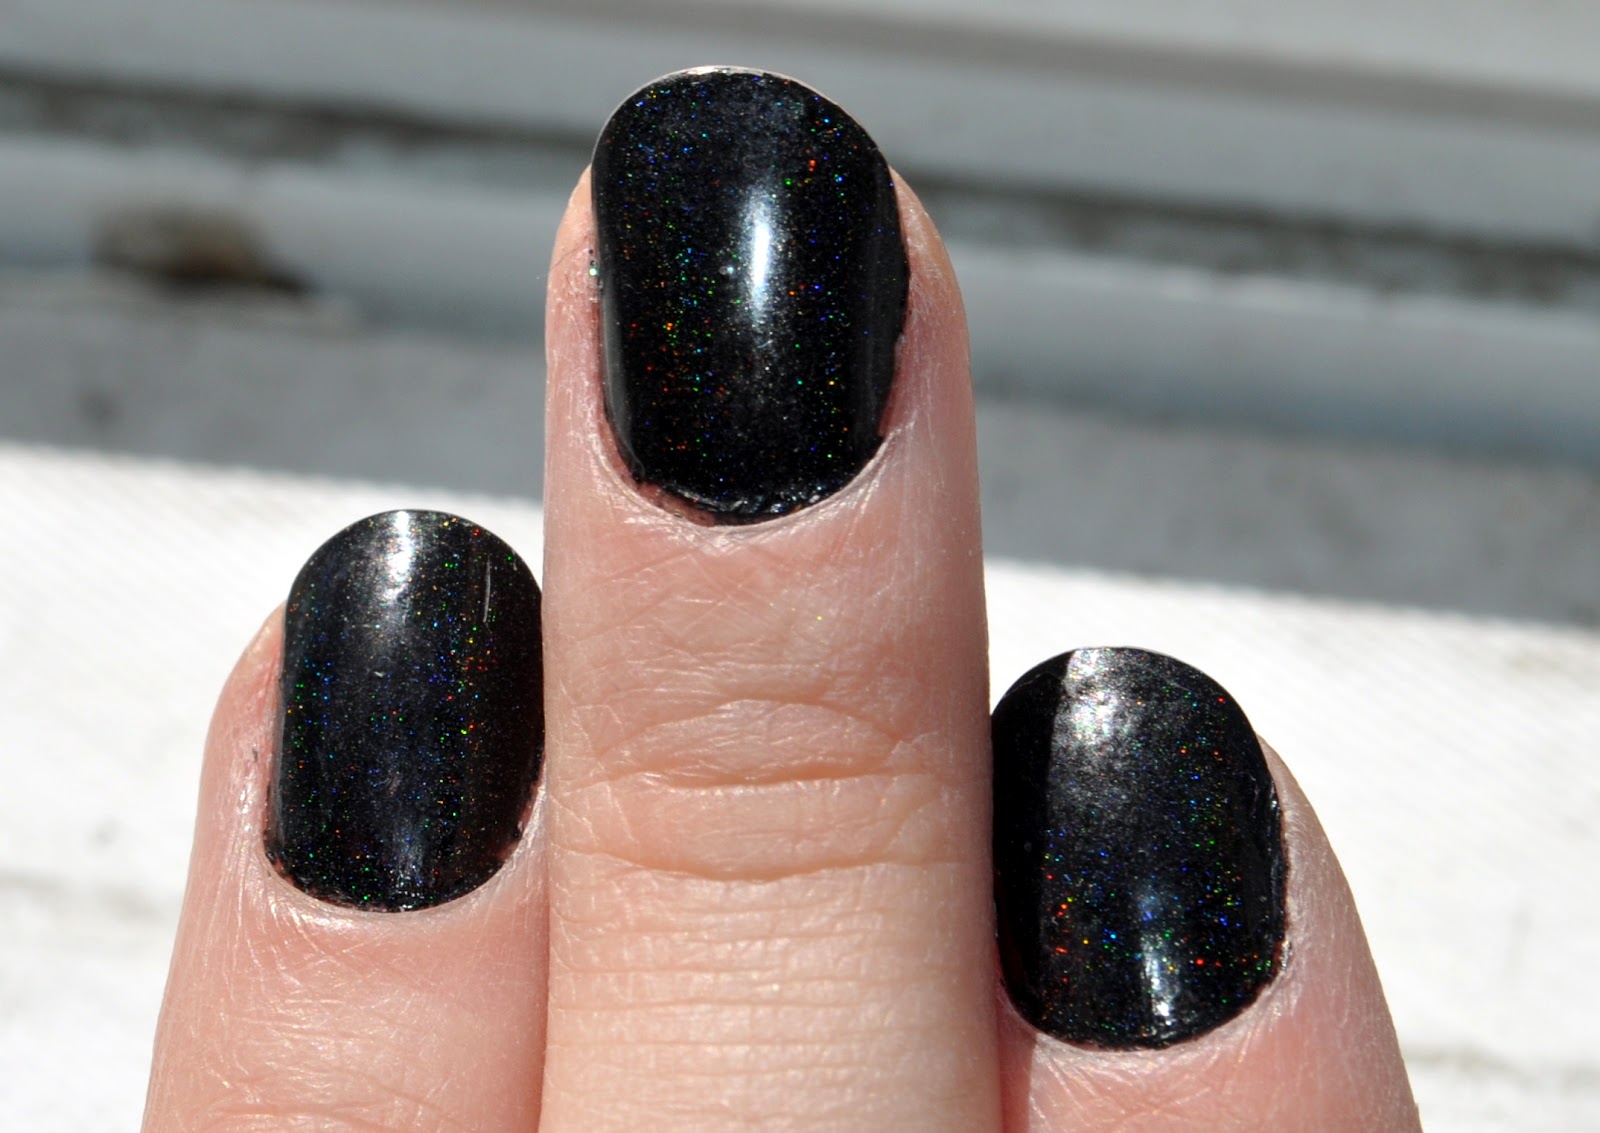
I decided to swatch it over another Deborah Lippmann color: Dancin' in the Sheets, which is very deep shimmery purple.I was hoping some of the purple shimmer would show through but the dark jelly of Across the Universe covered it up. I will just use a plain black base from now on.


I used two coats of Across the Universe to reach my desired level of glitter. You could definitely get buy with only one coat but I wanted a lot of glitter. 


Across the Universe went on like a dream! It is the perfect consistency. The glitter distributed itself perfectly without me having to physically place glitter or dig it out of the bottle. If you've used a polish with large glitter before, you know this is a rare quality.  


This polish also wears well. As you can probably tell from the tip wear, I've had this polish on for a couple days. There has been no chipping what so ever even on my dominant hand! 


Just look at all that sparkle!!! I know, tons of pictures but it's so pretty I had to post them all. And now for the close up shot so you can really see this polish shine.


So... much... glitter! You know how you know it's a stunning polish? When a ~50 year old straight man stops you to admire your nails. Now that's a complement! I also had several women stop me at work to ask if they were painted because they couldn't believe anything this pretty wasn't a sticker. 

If you couldn't tell, I love this polish. I'm not typically one to purchase an $18 polish, but this would be the exception. Now, I was lucky enough to get mine through a polish swap on Reddit, and my swapper is my new best friend! If you're only going to splurge on one polish, Deborah Lippmann Across the Universe should be it. You can purchase it directly from the Deborah Lippmann website or on Amazon

Until the next time, happy painting!


Monday, June 25, 2012

Ozotic 513

I know it's been a while since my last post. Sorry. I have been super busy training for my new job as a pharmacy tech. There is SO much to learn! Today however, I managed to find time to post about Ozotic 513 before heading for more training.

Ozotic 513 is part of the Oziotic line being discontinued. From what I heard, I believe there are only 30 bottles left! The only place you can still find it for sale is at Llarowe. I'll wait here while you go grab one of the last bottles. 


Ozotic 513 is a purple linear holographic polish from Australia. Look at all that holographic goodness! These first two pictures were taken indoors in normal light and it's still so sparkly!


If you've tried holographic polish before, then you know that it's an absolute no-no to apply a topcoat. Well, I totally wasn't paying attention and put on a coat of Seche Vite out of habit. To my great surprise, there was no effect on the holographic sparkle! This is the first holographic polish I have ever been able to wear a topcoat with!


Thanks to actually being able to wear a topcoat, this polished stayed on perfectly for 4 days and I was able to photograph is in the sun. Of course Ozotic 513 is just as stunning in the sun as it is in shade or artificial light. 


I have never tried such a stunning holographic polish! Not to mention, I've never had one that stayed perfect for 4 days and allowed the use of a topcoat! Now, aren't you glad I told you to grab one of the last bottles first? 

Pretty and Polished Pointers: Surprise Fan Appreciation Giveaway!!!!

Pretty and Polished Pointers: Surprise Fan Appreciation Giveaway!!!!: SURPRISE!!!! I truly appreciate each and every one of my followers. I have been slightly MIA lately with being in nail school. With trying m...

Tuesday, June 12, 2012

Liquid Jelly: Liquid Jelly 1,000 Follower Giveaway!

Liquid Jelly: Liquid Jelly 1,000 Follower Giveaway!: Hey all!  Sorry about the lack of posts these past few days.  Liquid Jelly recently reached 1,000 followers on GFC, so I've been putting tog...

Friday, June 8, 2012

glitter obsession: Giveaway Time!

glitter obsession: Giveaway Time!: I am so late with this post, and I do apologize. I've been grabbing the polishes, I just haven't posted it yet. I appreciate all of the loya...

Wednesday, June 6, 2012

Tequila Sunrise Mani!

It's been raining pretty much non stop here in Boston since Sunday, so I decided I needed to perk up my nails a bit. Since we are nearing summer and I have tropical things in mind (even if I'm not going anywhere tropical this summer), I wanted to do a tropical drink mani. I then realized this could be a good series for me! So here's the first in my series of tropical drink: Tequila Sunrise!


I used Sinful Colors Unicorn, Island Coral, and Hazard to create the gradient (using the make-up sponge method). I sponged the colors over a white base to really help the colors pop and added my favorite topcoat Nfu Oh #61 to make the nails sparkle. I then topped off my accent nail with a (fimo) lime slice just like the drink! Unfortunately, I didn't have any orange juice to make a tequila sunrise while doing my mani, so I enjoyed a Blue Point Toasted Lager instead. Close enough!

Thursday, May 31, 2012

MASH Matte Top Coat

Recently I received the opportunity to test and review MASH Nails new Matte Top Coat. Before you ask, yes, I was provided the top coat in return for a review. However, I was asked to be 100% honest and that's what I intend to do.


First up, the colors I used in this post: China Glaze Fast Track, NYC Black Lace Cream, MASH Matte Top Coat, and OPI for Sephora What's a Tire Jack?


Here is a close up view of the new MASH Matte Top Coat. It comes in your standard 0.5 oz and has a nice, soft brush for application.


Since I had a couple of interviews coming up and needed to look professional, I decided to use a base of CG Fast Track from the Hunger Games collection. Fast Track is a nude polish with very noticeable small gold glitter. 


While Fast Track is a lovely color, the difference in matte and regular top coat did not photograph well on it.  My index finger and ring finger have a standard top coat while my middle and pinky finger have the new MASH Matte Top Coat. 


You can almost see the difference here. Even though you can't really tell a difference between the matte and shiny topcoat in the picture, you can in real life. Let me tell you, Fast Track with the new MASH Matte Top Coat is stunning!

NYC Black w/ regular top coat, NYC black MASH Matte Top Coat, Sephora What's a Tire Jack no topcoat, Sephora What's a Tire Jack MASH Matte Top Coat
Since you can't see the difference in finish in the picture of Fast Track, I decided to do a real test for you. I started with two swatches each of NYC Black Cream Lace and Sephora by OPI What's a Tire Jack? Now, What's a Tire Jack is a naturally matte black polish and will be my basis for comparing the new MASH Matte Top Coat. First I compared the matte top coat to a shiny top coat both over NYC black (the first two nails). As you can see, the MASH Matte Top Coat definitely creates a more matte finish in comparison to a standard top coat. It definitely does not create a completely matte finish like the naturally matte Sephora polish. The last two nails compare a bare matte and the same matte with the new MASH Matte Top Coat. It still keeps that matte finish when used over a matte polish but does give it a little bit of shine. 

Verdict: While not creating a 100% matte finish, MASH Matte Top Coat does create the most matte finish of all the matte top coats I have tried. It goes on beautifully. Like most matte top coats I have tried, it does soften the underlying polish and takes a little longer than most polishes to dry. However, I have been wearing the MASH Matte Top Coat over Fast Track for 4 days now with not a chip in site! This is huge for matte polishes which tend to chip quickly. 

Is MASH Matte Top Coat 100% perfect... no. Is it the best matte top coat I have tried so far? Definitely! You can purchase the new matte top coat on the MASH website here: matte top coat for $7.99. 

Happy painting!


Polished Criminals Giveaway

Polished Criminals is doing a giveaway for reaching 1200 followers! You can check it out and enter here. Good luck!!

http://polishedcriminails.blogspot.com/2012/05/1200-follower-giveaway.html?showComment=1338467284294#c8548565257929747771

Wednesday, May 30, 2012

Glam Polish: 1500 Follower Giveaway - China Glaze On Safari Col...

Glam Polish: 1500 Follower Giveaway - China Glaze On Safari Col...: I have been anticipating the release of the China Glaze On Safari Collection since I saw the first promo pics last year and am excited to b...

Sunday, May 27, 2012

Computer Problems

So, I may be away from posting for a bit. My computer is acting up. I am not able to type e, c, d, or 3 (have been copying and pasting here). :( Hopefully I'll be back soon.

Wednesday, May 23, 2012

Gel Tips

I must confess... I'm cheating. I have been trying to grow my nails out for months with no luck. I have been using all sorts of nail treatments to help them grow but nothing seems to be working. Every time my nails get any sort of length they break. On the bright side, my nails are peeling less so I guess it's not all bad. I have also started taking a Biotin supplement, which is supposed to promote nail growth and health. I will report back on this in 2 months when hopefully I will see some results. However, I am impatient and have decided to do tip extensions. I know, I know, I'm sorry. Since I am attempting to make my nails healthier, I wanted to avoid acrylics and gel extensions (the kind that is similar to acrylics and uses a gel powder base). I eventually decided to do a gel manicure (gel nail polish dried with a UV light) over tip extensions. Gel polish does destroy the nail like typical acrylics do, granted it still isn't the best thing for your nails. 

Now, I've never been one to go to the salon and pay obnoxious amounts to get my nails done. It just never seemed logical to me when the supplies are not that expensive. So of course I did these myself too. I followed this wonderful tutorial by the Polished Mommy: Adding Length to Your Natural Nail.

In the tutorial, she uses the gelish brand products. You can get the basic kit here and the UV light here. That combination is $55. I used Red Carpet Manicure since that's what they had at Ulta. You can purchase the full set here for $60. I, however, am a grad student without $55-60 to shell out on nail products. After further investigation, I learned you really only need 3 things: the base coat, the top coat, and the UV Light. That's still $40 but I got it for $32 with one of Ulta's many 20% off coupons. 

Now, some of you may be wondering about all the other stuff in the kit. Well, I'll break it down for you. 
Erase = Acetone with coloring
Purify = Rubbing alcohol with coloring
Prep = Rubbing alcohol

I have successfully substituted these things for the official RCM components with no problems what so ever. 

If you didn't feel like watching the full 15 minute video tutorial I linked to above, here's the basic breakdown:

  1. Trim nails down short
  2. Find nail tips that fit your nail (like these) Make sure to use clear or natural colored for the most natural look unless you specifically want the french looking white tip
  3. Glue tips to natural nails
  4. Cut/file nails down to desired length and shape
  5. Place a line of nail glue along the seam where the fake and natural nail meet
  6. Use a nail buffer (like this) to smooth out the glue and buff the shine off the fake nail
  7. Wash hands to remove any dust
  8. Wipe each nail with rubbing alcohol
  9. Apply a VERY thin layer of the UV gel base coat and cure under the UV light for 1 minute. You will have to do each hand and the thumbs separately unless you have a full hand UV light. Note - nails will  remain sticky
  10. Apply the nail color of your choice. You can use the UV Gel Nail Color polishes but I just use regular  nail polish and it works just fine
  11. Apply a VERY thin layer of the UV top coat and cure under the UV light for 2 minutes. Note - nails will remain sticky
  12. Apply some rubbing alcohol to a paper towel and wipe the stickiness off you nails and you're done!

It seems like a lot of work but it only took me an hour from start to finish to do each hand. 


I used Sinful Colors You Just Wait. It was a little more sheer than I wanted so you can still see the line where the fake nail overlaps the natural nail. Oh well, lesson learned.


As you can see, the final product looks pretty natural. Since you apply a very thin layer of polish to the nail, the final result is the same thickness as a regularly painted nail. Now you can paint and decorate these nails just like you would your regular nail. Just remember to ONLY use NON-ACETONE nail polish remover to change colors. The gel softens when exposed to acetone, since that is how it is removed. 


Glam Polish: 1500 Follower Giveaway - China Glaze On Safari Col...

Glam Polish: 1500 Follower Giveaway - China Glaze On Safari Col...: I have been anticipating the release of the China Glaze On Safari Collection since I saw the first promo pics last year and am excited to b...

Monday, May 21, 2012

Fun Toes!

Since we are getting to summer sandal time, I decided I needed a fun summer pedicure to show off. Of course I had to start with a bright base. I decided on Julep's Helena since I hadn't used it yet. Helena is a bright pomegranate color with a satin finish. It's not quite glossy but also not quite matte. I then topped it with one of my favorites: Pretty and Polished's Valentino.


I love this combination. It reminds me of a Jackson Pollock painting! So much fun!


Just look at all those different hex glitters! Is it any wonder I love Valentino so much? 

Sunday, May 20, 2012

Pointless Cafe: Pointless Cafe's 1000 Follower Giveaway!

Pointless Cafe: Pointless Cafe's 1000 Follower Giveaway!: Well 1000 followers came and went and I am just now getting to a 1000 Follower Giveaway as a THANK YOU for following. Believe me, it is NO...

Lacquistry Silver Holo Shredded

If you know anything about Lacquistry, you know it is notoriously hard to get a hold of. For a while she was only doing custom polishes. Currently, she is finished with taking custom orders and is working on a new line to sell to the general public. Somehow I was lucky enough to come across a bottle of Lacquistry Silver Holo Shredded polish on eBay with no bids and was able to snag it. 


Look at all that holographic goodness!!


I applied one coat of Silver Holo Shredded over black for maximum effect.


Silver Holo Shredded is just PACKED with holographic foil that has been shredded into all different size pieces in a clear base.


Close up! You can really see the holographic sparkle in the blurred bottle. 


In sunlight!


Another lose up. This just reminds me of a broken mirror. Definitely tons of shine!


After I decided I loved it on my finger, I decided to go crazy on my toes. I applied 4 coats of Silver Holo Shredded over a silver base for maximum holo/shine effect. Boy was that awesome! My toes were almost blinding in the sun! 

If you ever get a chance to get your hands on Silver Holo Shredded or any other Lacquistry polish, do it! You won't be disappointed. I definitely wasn't. You're going to want to invest in a good, thick topcoat thought to help tame all the glitter though. I suggest Seche Vite or Out the Door. You can keep up on the latest Lacquistry developments here on her Facebook page.  Happy painting!

Saturday, May 19, 2012

Review: Wonder Beauty Products Hippie Fest

As promised in my previous post, here is one of my new colors: Wonder Beauty's Hippie Fest. Now this polish is a little different than you standard polish. You receive a pot of "concentrated color" and a bottle of clear "fusion polish." What you do is mix up the the color in the pot with an included stirring stick. Then you use the brush from the fusing polish to apply the color. If you want full color potential, wipe off most of the fusion polish before dipping it into the color pot. For more translucent coverage, don't wipe the off the brush before dipping. The clear fusion liquid can then be used as a topcoat, which is a nice bonus. 


Here you can see the pot that the concentrated color comes in. I used Hippie Fest over 2 coats of Sinful Colors Purple Diamond.


Hippie Fest contains all different shapes, colors, and sizes of purple, green, and blue metallic flakies in a clear base with iridescent and golden shimmer. 


Although the color pot format took a little bit to get used to, I kind of like it at least for this polish anyway. It really allowed me to dig in the pot and pick of the flakies. As you can probably see in the close up picture, there are definitely some bubbles present. However, I believe this is probably due to adapting to a new polish application method. I also LOVE this as a top coat. It's so pretty and different. You can purchase Hippie Fest on the Wonder Beauty Products page here. She is currently working on making her polishes available in regular polish form for those who do not like the pot method. I definitely suggest checking some of her polishes out! Happy painting! 

A preview of things to come

I got quite a few new colors lately and I thought I'd give you a quick preview of things to come. I will of course be doing a full write-up on each of these colors but I had to try them out as soon as I got them!


From left to right: Wonder Beauty Hippie Fest and Crotch Rocket, Zoya Astra and Myrta


A close up of Hippie Fest and Crotch Rocket


A close up of Astra and Myrta

On first glance, I love all these colors. Obviously, since I wasn't going to wear these four different colors like this and was going to be taking them off, I didn't bother to clean them up. I will definitely be doing full manicures of each and voice my opinions. But for now, just a peek!

Wednesday, May 16, 2012

My First Giveaway!


Ok, I finally reached 15 followers (actually 17 now), so I decided to do a small giveaway. I have three Kleancolor chunky holo glitters up for grabs. One lucky winner will receive all three!


The set includes Poppy, Clover, and Purple. Good luck and thanks for all the support!!

UPDATE: I realized, thanks to Nila in the comments, that I did not specify if this is an international giveaway or not. Unfortunately, I'm going to keep it US only since this is my first try at a giveaway and I'm unfamiliar with international shipping regulations. I will branch out into international giveaways in the future.

a Rafflecopter giveaway

Tuesday, May 15, 2012

Finals Procrastination

If you read any of my recent posts, you know I had finals last week. Of course I had to procrastinate a little bit and what better way to procrastinate than pain my nails? Since I was spending the majority of my time studying depressing topics like cancer and heart disease (I'm a MA Pathology student), I decided I needed bright, fun nails. I decided to try out two previously unused Zoya polishes: Charla and Apple. 


Charla is a bright tropical blue with a metallic finish. Apple, as the name suggests, is a vivid green color that is packed with gold sparkle. 


I decided to do contrasting hands as you can see since I couldn't decide on a main color. Boy do these colors SPARKLE!!!! They are so bright and fun!


Since I finished my nails and still felt like procrastinating more, I added some stamping. This was my first mostly successful attempt at full nail stamping. I was excited, and the fun print and colors cheered up my studying. Win! You can find Charla here and Apple here. They are normally $8 a piece but if you follow those links and sign up for a new account, you can get one free for just the price of shipping. Happy painting!

Monday, May 14, 2012

Glitter Gal Black 3D/Holo

I'm back from finals and have a TON of stuff to post. Up first: Glitter Gal Black 3D/Holographic polish. I was super excited to get this polish. I have seen so many people raving about Glitter Gal's polishes and had to check it out for myself. Now, this is not a cheap polish. It is $14 for a smaller than average bottle (0.3oz instead of the normal 0.5oz) and can be purchased at Llarowe. I lucked out and caught it on sale for $10.50


After looking at the bottle I was already impressed. Look at all that holographic glitter!! I could not wait to try it.... and DISAPPOINTMENT! 


Where is all that glitter?


There was so much in the bottle.


Even in full sunlight the holographic glitter is hardly noticeable.


The only way you can even see the holographic aspect of this polish is by getting in SUPER close. If I held out my hand my nails just looked like I painted them a flat black. This is definitely not what I expected from a $14 polish. 

Just for fun, let's look at the polish and a nail in full sunlight. Just look at all the holographic sparkle coming from the bottle. Where did it all go on the nail? 


Verdict: I wouldn't suggest picking up Glitter Gal Black 3D/Holo. I will definitely try another Glitter Gal polish since it did go on well and lasted a couple days. However, I probably try a lighter color to see if it lets the sparkle through better.